

Make a Kite
Let’s Go Fly A Kite: How to Make a Kite from a Recycled Plastic Bag
You will need a few common household items to start.
*Materials to build a kite:
Scissors
String
Glue
Two thin sticks
Ribbon
Ruler
Tape
Marker
At least two recycled plastic bags (or a garbage bag)
*For your homemade kite, choose sticks that are thin, lightweight and relatively straight. They should be similar in size to the plastic bag. Smaller sticks will work better with a smaller bag, whereas longer sticks work best for a garbage bag. You can also use
wooden dowels if you prefer.
Build the Kite Frame
*Using the sticks and string, build the frame of your DIY kite first. One stick should be slightly shorter than the other, approximately 4 to 6 inches depending on the size of your kite.
*Cross the smaller stick over the longer stick in the shape of a lower-case T. The horizontal stick will be about one-third of the way from the top of the vertical stick. Secure the sticks together using the string and glue. Place a dot of glue between the two sticks and then wrap the string around the intersection several times ensuring that the sticks meet at a right angle.
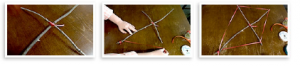
*Next, you will use the string to create an outline of the kite around the frame. Start by gluing the string to the bottom of the frame. Then wrap the string around the stick a few times. Use the string to create a tight line to the end of the next stick. Repeat the process until the shape is entirely outlined and cut the string from the spool and tie a knot at the same spot you began.
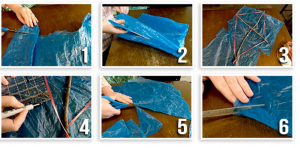
*Cut Out the Sail for Your Plastic Bag Kite
- Cut the plastic handles off your bag.
- Cut the sides of your plastic bag so it becomes a flat sheet.
- Lay the kite frame on the flat sheet of plastic to make sure it fits. If your frame is too large, use a second bag and tape the two sheets of plastic together.
- Using your ruler and marker, measure one inch wider than the frame and then trace the shape.
- Cut along this line. and cut one inch at every corner. (see below)
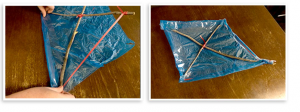
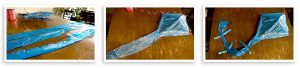
*Connect the Kite Sail to the Frame Now, you’ll combine your frame with the plastic bag kite sail to finish the main body:
- Place the frame of the kite in the center of the kite sail.
- Start on one side and fold the excess plastic over the string of the frame.
- Using tape, secure the folded edge to the sail. Cover the entire length with tape to prevent the wind from coming between the layers.
- Repeat until all edges are secured to the sail.
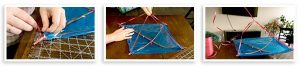
Attach the Fly Line You have the main body of your plastic bag kite and now it’s time to add the accessories to help it fly.
- Cut a piece of string that is the length of the vertical stick plus about 4 to 6 inches. 11. Tie one end of the string tightly to the top of the vertical stick and the other end to the bottom of the vertical stick, outside the kite sail.
- Repeat the process with the horizontal stick. The string should be as long as the stick plus 4 to 6 inches.
13.Use tape or glue to make sure these knots don’t slide around on the sticks.
- Where these two strings intersect, tie the spool of string you’ll use to fly your kite. You can also create your own spool by wrapping a length of string around a toilet paper roll.
Add Kite Tail With Ribbon
- Using another plastic bag, cut a strip that is up to 3 feet long. Tape the strip to the bottom point of the kite.
16.Cut at least three 6-inch pieces of ribbon and tie them to the kite tail. Add others for decoration or additional weight.
- Other tails can be added to the two side corners of the kite for additional balancing if needed.
Go Fly Your Plastic Bag Kite
credit Given to: MEGHAN PAYNTER