

Cutesy Craft: Faux Stained Glass
A little history behind “Stained Glass!”
This article was originally published on The Conversation. Read the original article.
Stained glass facts for kids
Kids Encyclopedia Facts
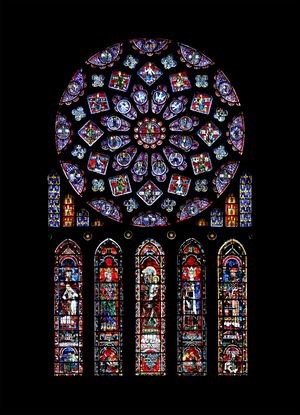
The north transept rose of Chartres Cathedral. It represents the Virgin Mary as Queen of Heaven, surrounded by Biblical kings and prophets. The window includes the arms of France and Castile
Stain Glass was used during the Medieval times. Stained glass is glass colored by adding metallic salts when it is made. The colored glass is made into stained glass windows. Small pieces of glass are arranged to form patterns or pictures. The glass is held together by strips of lead and supported by a rigid frame. Painted details and yellow stain are often used to improve the design. The term stained glass is also applied to windows in which the colors have been painted onto the glass and then fused to the glass in a kiln. Stained glass is much used in Christian art but other themes are not rare. It is still popular today, and often called art glass. It is often used in luxury homes and commercial buildings.
Some colors are added to stained glass by the salts of:
- Copper: metal gives dark red glass
- Gold: metal in tiny amounts (0.001%) produces ruby red glass
- Silver, usually silver nitrate, gives range of red to yellow colors
- Cobalt: brilliant blue
- Manganese dioxide: green
- Iron (II) oxide: blue green
- Chromium: dark green
How to Make Faux Stained Glass
Supplies Needed
Elmer’s Washable No-Run School Glue
Elmer’s Washable Clear School Glue
Painters Marker – Medium Tip Black
Picture Frame/ You will remove the glass from the frame
Acrylic Paints different colors
Craft blade
Paintbrush
Draw a pattern on a sheet of white paper
Skewer
Glitter
Instructions
- Remove glass from picture frame and place over your pattern.
2. Add about 1 tsp of black acrylic paint to the Elmer’s school glue and mix with a skewer in the glue bottle. Use the glue bottle to add black “leading”, this is the outline of your pattern, following the lines of your pattern. Allow to dry overnight. - Use your craft blade to neaten up any lines.
4. Mix your colors one at a time. Mix about 3 tablespoons of clear glue to a few drops of acrylic paint. You may add glitter. Heavily add the paint being sure to go all the way to the “leading”, lines of your pattern. Even overlapping a bit is fine. Allow project to dry for several hours.
5. Use your black Painters marker to touch up the “leading” where the paint has overlapped. - When glass is dry, you may place it in the frame.
*When you have completed your stained glass, you may email us a picture of your framed stained-glass project, and we will post it on our Facebook page.
Teen Center: mplteencenter@gmail.com