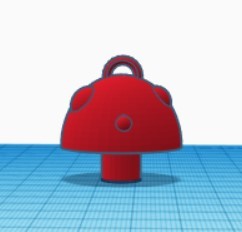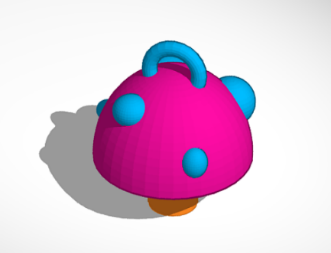
How to Make a 3D Mushroom
- Insert a Cylinder.
- Click on the bottom right corner box of the shape and change its dimensions to 10.00
- Insert a Half-Sphere.
- Click on the bottom right corner box and change the dimensions to 32.00
- Next, look for the white box at the top of the shape; click on it and change the number inside to 19.00
- Grab the black triangle above the Half-Sphere and raise it to a height of 9.00.
- Center the half-sphere on top of the cylinder (change around the camera angle if you need to)
- Insert 5 spheres; separated throughout the workplane.
- Change each of the spheres to the following sizes by clicking in the corner white box and the white box above the sphere. Change the numbers that appear (it doesn’t matter which sphere is which size) to 4.00, 5.00, 7.00, 8.00, 10.00. Make sure you use the little black triangle to adjust the height of the sphere. Then place the spheres within the Half-Sphere wherever you’d like.
- Insert a Torus.
- Click on the bottom right box and change the numbers inside to 11.00 each.
- Click on the double sided grey arrow above the Torus and change the angle to 90o
- Click on the little black triangle above the Torus and adjust its height to be 25.00
- Click on the shape and on the sidebar that appears on the right, look for the feature that says “Tube” and change the number to 1.5.
- Adjust the Torus to be centered on the top of the Mushroom.
- Click and drag to highlight the whole shape and press Ctrl+G on the keyboard to group all the items together.
Congratulations! You’ve finished making a 3D model of a Mushroom