How to make a 3D Sandcastle
- Insert a Cylinder.
- Insert a second Cylinder.
- Click on the bottom white box and change the numbers on both sides to 15.00.
- Raise the Cylinder by grabbing the little black triangle above the shape raise it until the number in the top box says 17.
- Center the smaller Cylinder into the top of the bigger Cylinder.
- Click on the smaller Cylinder and in the sidebar that appears on the right, click “hole.”
- Insert a Box.
- Click on the bottom right white box and change the number on the right side to 7.00 and change the number on the left to 25.00.
- Click on the white box above the shape and change the number inside to 10.00.
- Raise the Box by grabbing the little black triangle above the shape raise it until the number in the top box says 17.
- Center the Box into the top of the bigger Cylinder.
- Click on the Box and in the sidebar that appears on the right, click “hole.”
- Make sure the Box is still selected and press CTRL+D to duplicate your Box. (The duplicate box is directly on top of the other box, so you just have to click and drag to move it and you will see it.)
- Grab the double sided arrow at the base of the second Box and turn it 90 degrees.
- Center the second Box into the top of the bigger Cylinder. The two Boxes should be in the shape of a +.
- Click and drag your cursor within the workplane to select your work. Press CTRL+G on your keyboard to group the individual pieces together, creating your first Tower.
- Click on the Tower and press CTRL+D.
- Move that to the side and press CTRL+D again.
- Move the third Tower to the side and click on the white box above the shape and change the number inside to 34.00.
- Place the tallest tower in the center of your workplane.
- Place the two smaller towers on either side of the tallest tower, making sure the sides overlap.
- Insert a Rounded Roof.
- Click on the bottom right white box and change the number on the right side to 5.00 and change the number on the left to 10.00.
- Click on the Rounded Roof and in the sidebar that appears on the right, click “hole.”
- Click on the Rounded Roof and press CTRL+D.
- Move that to the side and press CTRL+D again. You should have three Rounded Roofs.
- Center each of the Rounded Roofs on the front of each Tower, making sure the Rounded Roofs are halfway inside of each Tower.
- Insert a Torus.
- Click on the bottom right box and change the numbers inside to 11.00 each.
- Grab the double sided arrow above the Torus and turn it 90 degrees.
- Grab the double sided arrow in front of the Torus and turn it 90 degrees.
- Click on the little black triangle above the Torus and adjust its height to be 30.00
- Click on the shape and on the sidebar that appears on the right, look for the feature that says “Tube” and change the number to 1.5.
- Adjust the Torus to be centered on the top of the sandcastle.
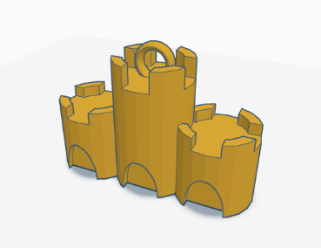
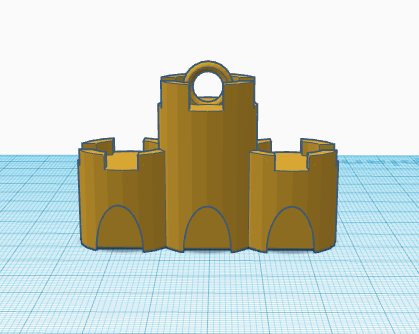
- Click and drag your cursor within the workplane to select the whole Sandcastle. Press CTRL+G on your keyboard to group the individual pieces together.
Congratulations! You just made your own 3D sandcastle keychain!