How to Make a 3D Shamrock
- Insert a Sphere.
- Grab one of the bottom corners and click into the number box. Make one side 31.00 and the other side 20.00.
- Grab the double sided arrow to the side at the bottom of the Sphere and turn it 22.5 degrees.
- Click on the Sphere and press ctrl+D to make a second Sphere.
- Click the new Sphere and press the M on the keyboard.
- Press the arrow that appears on the workplane to the right of the sphere to mirror the Sphere into the opposite direction.
- Click and drag this new Sphere to a position overlapping the other Sphere to make a Rounded Heart shape.
- Click and drag to highlight these two Spheres and hit ctrl+G to group them together.
- Click on the Rounded Heart and press ctrl+D to make a second Rounded Heart.
- Click and drag the second Rounded Heart to the side and grab the double sided arrow and turn it 90 degrees.
- Position this by the first Rounded Heart to start forming the Shamrock.
- Click on the second Rounded Heart and press ctrl+D two more times to make a third and fourth heart (if this doesn’t work, please ask for assistance). All of the bottoms of the Rounded Hearts should be joining in the center to make a neat compact Shamrock shape. Adjust things as needed.
- Click and drag to highlight all of the Rounded Hearts and hit ctrl+G to group them together.
- Insert a Torus from the Basic Shapes selection on the right.
- Click on the Torus and in the box that appears on the right, go to Tube, click the number, and change it to 2.
- Click the bottom left corner of the Torus and click into the number box. Make the side box 26.30 and the bottom box 31.00.
- Place the Torus under one of the intersecting points between the bottom two rounded hearts.
- Grab the black triangular shape above the torus and adjust it to be the height of 7.30.
- Insert a Heart from the Basic Shapes selection on the right.
- Grab the double sided arrow to the bottom of the Heart (from the top camera angle) and turn it -90 degrees.
- Grab the black triangular shape above the Heart and adjust it to be the height of 4.40.
- Place the Heart over the part of the stem that we want to eliminate, being careful to line up the bottom point of the Heart with the Top of the Rounded Heart.
- Click on the Heart and press ctrl+D to make a second Heart.
- Move this second Heart to shorten the stem of the Shamrock to the desired length.
- Click and drag to highlight only the two Hearts covering the stem and select Hole from the box that appears on the right.
- Insert another Torus.
- Click on the Torus and in the box that appears on the right, go to Tube, click the number, and change it to 2.
- Grab the black triangular shape above the torus and adjust it to be the height of 7.30.
- Place the torus into the top of the Shamrock and center it.
- Click and drag to highlight your shamrock and hit ctrl+G to group all of the objects together.
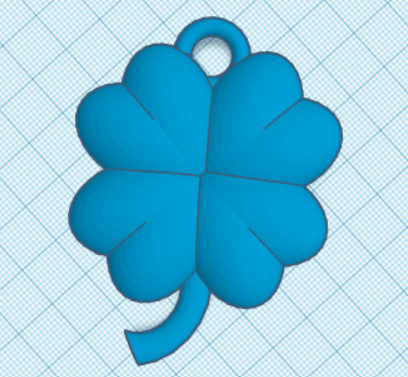
Congratulations, you have just finished designing your very own 3D Shamrock keychain!