

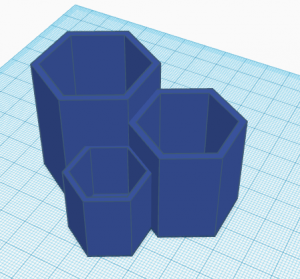
How to make a 3D Geometric Pencil Holder
Part I: Big Hexagon
1. Insert a Polygon.
2. Click on the bottom-right, white square and change the bottom number to 36.00 and the right number to 41.40.
3. Click on the top white square and change the number to 46.00.
4. Using ctrl+D duplicate and drag out the duplicated Polygon (It will be inside the old Polygon)
5. Turn the new Polygon into a hole with the toolbox.
6. On the Holed Polygon click on the bottom-right, white square and change the bottom number to 32.00 and the right number to 36.80.
7. On the Holed Polygon click and drag on the top black arrow until the lower number is 3.00.
8. Use shift+click to select the Solid Polygon and Holed Polygon.
9. Press L to open the alignment tool.
10. On the two axes on the workplane select the middle dots. Do not click on any dot for the vertical axis. (The shapes should now be in the middle of each other with the Holed Polygon sticking out the top.)
11. Press ctrl+G to group the shapes.
Part II: Middle Hexagon
12. Insert a Polygon.
13. Click on the bottom-right, white square and change the bottom number to 32.00 and the right number to 36.80.
14. Click on the top white square and change the number to 36.00.
15. Using ctrl+D duplicate and drag out the duplicated Polygon (It will be inside the old Polygon)
16. Turn the new Polygon into a hole with the toolbox.
17. On the Holed Polygon click on the bottom-right, white square and change the bottom number to 28.00 and the right number to 32.20.
18. On the Holed Polygon click and drag on the top black arrow until the lower number is 3.00.
19. Repeat the steps to align and group the Polygons.
Part III: Small Hexagon
20. Insert a Polygon.
21. Click on the bottom-right, white square and change the bottom number to 24.00 and the right number to 27.60.
22. Click on the top white square and change the number to 26.00.
23. Using ctrl+D duplicate and drag out the duplicated Polygon (It will be inside the old Polygon)
24. Turn the new Polygon into a hole with the toolbox.
25. On the Holed Polygon click on the bottom-right, white square and change the bottom number to 21.00 and the right number to 24.15.
26. On the Holed Polygon click and drag on the top black arrow until the lower number is 3.00.
27. Repeat the steps to align and group the Polygons.
Part IV: Bring Together
28. Click and drag the Medium Shape to be brought slightly into the right side of the Big shape, and bring it forward so the angle is flush. (Try turning down your snap grid and using arrow keys if you are struggling)
29. Click and drag the Small Shape to put it in the flush angle you made. Be sure to check the underside of the shape to make sure the whole of the sides are placed inside the larger shapes, but not sticking through the walls
30. Select and group all the shapes together.
31. Congratulations you’ve completed your 3D Geometric Pencil Holder.