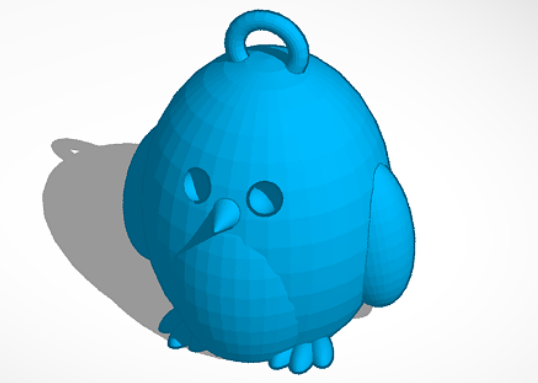
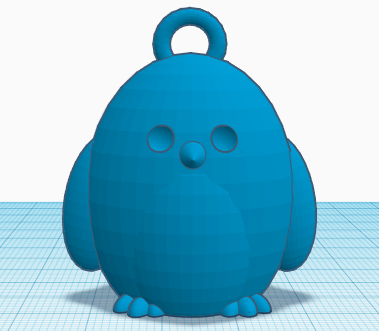
How to Make a 3D Penguin
- Insert a sphere.
- Grab the top and click into the number box to change the height to 40.00.
- Grab one of the bottom corners and make it 30.00 by 30.00.
- Grab the black triangular shape above the sphere and adjust it to be the height of -5.00.
- Insert a wedge.
- Grab the double sided arrow above the wedge and turn it -45 degrees.
- Grab one of the bottom corners and make it 30.00 by 30.00.
- Grab the black triangular shape above the wedge and adjust it to be the height of -14.00.
- Center the wedge under the sphere.
- Click on the wedge and in the box that pops up, change the setting from solid to hole.
- Insert a second sphere.
- Grab the top and click into the number box to change the height to 30.00.
- Grab one of the bottom corners and make it 20.00 by 20.00.
- Grab the black triangular shape above the wedge and adjust it to be the height of -3.00.
- Place the second smaller sphere in the center of the bigger sphere, but make it stick out a little to make the penguin’s little belly.
- Insert a third sphere.
- Grab one of the bottom corners and make it 10.00 by 10.00.
- Grab the double sided arrow above the sphere and turn it -15 degrees.
- Grab the black triangular shape above the sphere and adjust it to be the height of 4.00.
- Click on the sphere and press cntrl+D to make a second sphere.
- Click the sphere and press the M on the keyboard.
- Press the arrow that appears on the workplane to mirror the sphere into the opposite direction.
- Place each angled sphere centered on either side of the penguin to make his little flippers.
- Insert a cone.
- Grab one of the bottom corners and make it 4.00 by 4.00.
- Grab the top to change the height to 5.00.
- Grab the black triangular shape above the cone and adjust it to be the height of 19.50.
- Grab the double sided arrow above the sphere and turn it 90 degrees.
- Place the cone into the middle of his face to make his beak.
- Insert a sphere.
- Grab one of the bottom corners and make it 4.00 by 4.00.
- Grab the top to change the height to 4.00.
- Grab the black triangular shape above the cone and adjust it to be the height of 22.00.
- Click on the sphere and press cntrl+D to make a second sphere.
- Place both spheres into the face to make his eyes.
- Click on the eye sphere and in the box that pops up, change the setting from solid to hole.
- Do the same to the other eye sphere.
- Insert a half sphere.
- Grab one of the bottom corners and make it 7.00 by 3.00.
- Grab the top to change the height to 2.00.
- Grab the double sided arrow on the workplane beside the half sphere and turn it 12 degrees.
- Click on the half sphere and press cntrl+D to make a second half sphere.
- Click the half sphere and press the M on the keyboard.
- Press the arrow that appears on the workplane to mirror the half sphere into the opposite direction.
- Place both of these half spheres under the penguin to make his middle toe.
- Click on one of the half spheres and press cntrl+D.
- Move this new half sphere over using the directional keys on the keyboard to make the second toe.
- Press cntrl+D to make a third toe and move it to the other side of the first toe you placed. (the first toe you made should be in the middle)
- Repeat steps 45-47 for the toes on the other side.
- Insert a torus.
- Grab the double sided arrow and rotate the torus 90 degrees.
- Grab the black triangular shape above the torus and adjust it to be the height of 32.00.
- Grab the top point and make it 9.50 tall.
- Grab one of the bottom corners and make it 10.00 by 2.00.
- Click on the Torus and in the box that appears on the right, go to Tube, click the number, and change it to 2.
- Place the torus into the top of the penguin and center it.
- Click and drag to highlight your penguin and hit cntrl+G to group all of the objects together.
Congratulations you have just finished designing your very own 3D penguin keychain.


